Tampilkan postingan dengan label VEGETARIAN. Tampilkan semua postingan

Senin, 13 Juli 2015

Posted by Unknown | File under : , , ,
A friend of mine tipped me off to this fantastic recipe at http://damndelicious.net  It provides that COMFORT FOOD taste AND it is totally healthy for you (a rare combination)!! This recipe is super quick and easy to make!!  It is definitely going directly into my 5 star recipe box and I will be freezing single portions of it for my busy day quick hot lunch!! I even enjoy this cold!!


In a large skillet place:
1 tablespoon canola oil
2 cloves garlic minced
1 seeded and chopped jalapeno (optional)
1/2 cup chopped sweet onion 
 
Saute above ingredients for a couple of minutes or until the onion starts to smell sweet, then add:

1 cup quinoa
15 ounce can drained kidney (or black) beans
1 cup beef broth (or vegetable broth)
14.5 ounce can fire roasted tomatoes (undrained)
1 cup corn  (I used frozen)
2 teaspoons chili powder
1 teaspoon ground cumin
3/4 teaspoon salt
1/4 teaspoon black pepper
4 ounce can diced mild green chiles

Sautee onions, then add everything else. Stir well, and bring to a boil. Lower heat and put the lid on and simmer for 15-20 minutes (depending on how hot your pan is).  After 20 minutes:

Turn off the heat and add:
1 peeled and diced avocado
Juice of 1 lime (optional)
2 tablespoons chopped fresh cilantro (optional)

Toss and serve immediately.


NOTE: leave out the jalapeno if you don't like spice-heat.

NOTE: Quinoa is a high protein grain that is VERY healthy for you and is an excellent addition to anyone dealing with diabetic issues.

NOTE: When I don't include the jalapeno, I increase the chili powder to 3 teaspoons.

NOTE: This freezes very well (before you add the avocado). I put it in one cup containers and freeze them.  To eat, put it in the microwave frozen and heat for 2 minutes, THEN add the avocado. It makes a great lunch.

NOTE: My all time favorite way to eat this (and maybe it is just me), but I love it steaming hot, topped with a scoop of fat free cottage cheese.  Yum.

Kamis, 13 Januari 2011

Posted by Unknown | File under : , , ,
Don't let this terrible photo fool you, these onion rings are deliciously addicting!! I found this recipe on Donna's blog over at My Tasty Treasures. There are only 2 tablespoons of oil in the whole batch, but you would never know it; this recipe is a keeper!!


The onion rings bake up light as air, super crispy and packed with flavor!!
.
1 medium size vidalia onion
1½ cups corn flakes
½ cup plain dry bread crumbs (I used Panko)
1 large egg
½ cup low fat buttermilk
¼ cup flour
1/8 teaspoon cayenne pepper
pepper to taste
.
Put the corn flakes and bread crumbs in the food processor and pulse until you get fine crumbs (set aside).
.
Mix the egg, buttermilk, flour, cayenne and black pepper. Cut the ends off of the vidalia onion and then cut the center of the onion into four thick slices. Separate the rings.
.
Dip the raw onion rings into the batter and set them on a baking rack so the excess batter will drip off (put a baking sheet under the rack, or set the whole rack in the sink to help reduce any mess).
.
Put 2 tablespoons olive oil (I used canola oil) on a rimmed baking sheet and put it in the oven for 2 minutes to preheat. After 2 minutes, remove the pan and tilt it to redistribute the oil. Coat the battered rings in the fine dry crumb mixture and place on the baking sheet.

Bake for 16 minutes in a 450 degree pre-heated oven (turn them over half way through). Remove from oven and sprinkle with coarse salt.

NOTE: I don't know if these would be as good with a plain yellow onion. I used vidalia's because they are our favorite. Any sweet onion would work.

Selasa, 16 November 2010

This is a clone recipe for Heinz chili sauce. It is so easy...takes every day ingredients and is even tastier than the original!! Chili sauce was never a pantry staple for me; I always found it on my shopping list for holiday and special occasion recipes, like this shrimp cocktail (which calls for Heinz chili sauce). I will never buy commercial chili sauce again because this is so much better (and cheaper)!!!


1 cup of tomato sauce
1/3 cup light corn syrup
1/4 cup white vinegar
2 teaspoons dry onion flakes
2 teaspoons granulated sugar
1 teaspoon salt
1 teaspoon lemon juice
1/8 teaspoon garlic powder

Whisk everything together and bring to a boil in a small saucepan with a heavy bottom. Turn heat down to a low simmer and cook for 25-30 minutes, depending on how fast you are simmering it (mine was done in 25 minutes). Watch it towards the end so it doesn't scorch.
Cool to room temperature, then cover and chill.
It will get nice and thick like this.

NOTE: I made this recipe, exactly as it is stated above, I don't know how it would effect the final results if you use fresh onions.

Senin, 01 November 2010

Posted by Unknown | File under : , , ,
This simple (and versatile) little side dish is just delightful. The orzo is toasted in butter before boiling, which adds an extra flavor, then it is tossed with Parmesan and fresh basil. Whether you use it as a side dish or a main dish, it is a very nice change.2 tablespoons butter
1 cup uncooked orzo pasta
2 + 1/4 cups chicken broth
1/2 cup grated Parmesan cheese
1/4 cup thinly sliced fresh basil
1/2 teaspoon salt
1/4 teaspoon black pepper
pinch of red pepper flakes
.
Melt the butter in a heavy bottomed pan that has a tight fitting lid. Add the UNCOOKED orzo pasta and stir until completely coated with the butter. Cook on medium-high until the pasta turns golden to lightly brown (watch it because once it starts to turn, it turns quickly).
.
Stir in the chicken broth, red pepper lakes, salt and pepper and bring to a boil. Cover and reduce heat to a simmer. Simmer until the orzo is tender and liquid is (almost) all absorbed. This will take 15 to 20 minutes depending on how fast your simmer is.
.
When orzo is tender, remove from heat and stir in Parmesan cheese and fresh basil. Serve hot.
.
NOTE: Just about anything can be added to this recipe, next time I think I'll include a little crisp bacon some mushrooms!!!

Jumat, 24 September 2010

Posted by Unknown | File under : , , ,
When I first found this little recipe that promised fresh corn bread in 3 minutes, I thought "no way". Well, I'm here to tell you "yes way"...it is excellent!!

You won't get the brown crunchy part of corn bread that a lot of people love, but, HEY!! THREE MINUTES!! The taste and texture is surprisingly good and when you weigh the benefits of serving hot corn bread in a snap, well...I will definitely be using this recipe often!!


2 tablespoons vegetable oil
1/2 cup milk
1 egg
1/2 teaspoon vanilla
1/2 cup white flour
1/2 cup corn meal
2 tablespoons white sugar
2 teaspoons baking powder
1/4 teaspoon salt

Mix everything with a whisk and pour into a greased microwave safe baking dish. I used a 6 x 6 x 2 baking dish.

Microwave on high for 3 minutes. If your microwave doesn't have a carousel, then manually rotate the dish half way through the cooking cycle.

 
NOTE: I used a 1000 watt microwave and it took exactly 3 minutes. If your microwave is different than that, you may have to adjust the cooking time.

NOTE: I used cooking spray inside of the baking dish and the cooked corn bread removed very easily.

Rabu, 24 Maret 2010

Posted by Unknown | File under : , ,


I can't tell you how many times I've been asked for this recipe. They are quick to fix (out of ingredients that are always on hand) and they reheat well.
 
This super-simple recipe starts with a refrigerator biscuit that is rolled out flat and topped with a cheesy-herb mixture and baked. It's a great "go with" for any dinner..
.
10 ounce tube of refrigerator (flaky) biscuits
1/2 cup mayonnaise
2/3 cup grated Parmesan cheese (packed fairly tight)
1/4 teaspoon of dry basil leaves
1/4 teaspoon of dry oregano leaves
3 tablespoons of thinly slivered green onion tops1 clove of garlic (minced)
1/4 teaspoon black pepper
.
Mix everything together well (except the biscuits) and set aside. Separate refrigerator biscuits and roll each one out into a circle approximately 4” across.
.
Using your fingers, press on the center of the biscuit’s a little more, leaving the outer edge just a little bit thicker than the center (like a pizza). Divide cheese mixture evenly between the biscuits and spread it around (staying back from the edge).
.
Bake on lightly sprayed cookie sheet, at 350° for about 15 minutes or until golden around the edges.
..
NOTE: Change the kind of herbs if there is something you like better.
.
NOTE: I usually cook them for about 14½ minutes then turn the broiler on for about 30 seconds to give them just a little extra color (but watch them carefully). ..
NOTE: Don’t flour your counter before rolling out these biscuits.
.
NOTE: I've always used mayonnaise, I'm sure how Miracle Whip would taste.
.
NOTE: Any style of refrigerator biscuit will work.

Rabu, 10 Februari 2010

Posted by Unknown | File under : ,
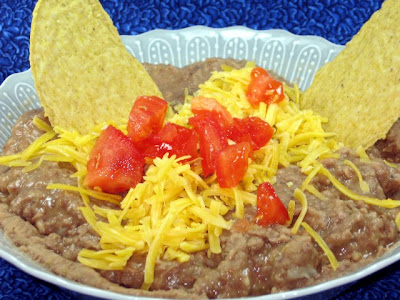
I have been tweaking this recipe for about a year and I finally have it just the way we like it. It is one of those great recipes that you dump everything in the slow cooker and wait for the magic.

Canned refried beans just don't "do it" for us after trying this one. Honestly, I could just eat this with a spoon right out of the slow cooker...forget the toppings.

1 medium sweet onion (cut in half but not chopped)
3 cups of rinsed (and sorted) DRY pinto beans
2 tsp. salt
1 tsp. black pepper
3 tsp. chili powder
6 slices of crisp bacon (crumbled)

1 tsp. ground cumin
(1) 4 ounce can green mild chiles
½ fresh jalapeno (seeded and chopped)
9 cups water

Put everything in the crockpot and cook on high for 8 hours or till tender. Drain but reserve liquid. Put drained bean mixture into the food processor and puree, adding just enough of the reserved bean liquid to make the beans the right consistency. Keep warm in the crock pot.


NOTE: No need to pre-soak the beans


NOTE: Check the beans after 6-7 hours, if it looks like they are losing too much liquid, add another cup of water.

NOTE: I put the cooked onion (from the crockpot) in the food processor with the beans. A few pulses and it disappears.

NOTE: It's up to you how finely you puree the beans. If you like your refried beans a little chunky, just pulse them a few times.
NOTE: I use a medium size sweet onion, like a Vidalia
NOTE: Leave out the bacon if you are going vegetarian.

Jumat, 01 Januari 2010

Posted by Unknown | File under : , , ,
I made this recipe, for the first time, on Christmas Eve and they were a big hit. I put the recipe together, early in the day and just popped them in the oven for 25 minutes just before dinner. Super simple and absolutely delicious.

12 whole (large) fresh mushrooms

Clean mushrooms and carefully break off stems and reserve. Using a melon baller, scoop the rest of the stem and gills out, making a nice big pocket in the mushroom.

1 tablespoon canola oil
1 large clove garlic minced (more if you like)
(1) 8 ounce package cream cheese, softened
¼ cup grated Parmesan cheese (not powdered kind)
¼ teaspoon black pepper
¼ teaspoon onion powder
¼ teaspoon ground cayenne pepper
Trim off any hardened parts of the mushroom stems and chop the good part of the stems (and gill trimmings) very fine, using a food processor.
Saute the finely chopped stems and pieces in canola oil until all moisture has evaporated (add the garlic to the pan about half way through this step so you don't burn it). Set this aside to cool a little.
When the mushroom-garlic mixture has cooled, mix in the cream cheese, Parmesan, black pepper, onion powder and cayenne pepper; mix very well (it will be very thick). Fill the mushroom caps generously, piling it high on each cap. Place the stuffed mushrooms on a lightly sprayed baking dish (don't let them touch each other) and bake at 350 for 20-30 minutes depending on how large your mushrooms are. Let them sit for a few minutes before serving.
NOTE: I made a double batch (24) of 2½" wide mushrooms (as a side dish) and served it to 8 adults and had no leftovers...so make plenty...they are really good.
 

Kamis, 05 November 2009

More often than not, we have sourdough waffles or sourdough pancakes on the weekends. However, recently I've been searching for a quick-fix waffle recipe and I have found a great one in our electric co-op newsletter, submitted by a lady named Sarah Wolcoff. Her deliciously moist and fluffy cream cheese waffles are oh so good!!!

1¾ cup all purpose flour
2 tablespoons brown sugar
1 tablespoon baking powder
1/8 teaspoon salt
(1) 3 ounce cream cheese (room temperature)
2 eggs (separated)
1½ cups milk
2 tablespoons vegetable oil
1 teaspoon vanilla extract (my tweak)

Mix the cream cheese and 2 egg yolks together until smooth; stir in milk, vanillaextract and vegetable oil. Add dry ingredients and stir just until combined, it will be a little lumpy. Beat 2 egg whites until stiff peaks form and then fold them gently into the batter, leaving lots of fluffs of egg white (don't over mix). Cook in waffle iron. Recipe makes about 6 good size waffles

Selasa, 27 Oktober 2009

Posted by Unknown | File under : ,
I make these rolls about twice a month and freeze them (fully baked) in a high quality freezer container. A frozen baked roll takes about 4-5 minutes (at 350) to reheat. They are also very handy for the holidays because they are more festive than standard dinner rolls and since they are already fully baked, you can just pop them all in the oven five minutes before dinner.


3½ cups all purpose flour
2 tablespoons dry active yeast
½ cup warm milk
1/3 cup white sugar
1 teaspoon lemon zest
4 eggs at room temperature
½ teaspoon salt
2/3 cup unsalted butter at room temperature

In a large mixing bowl, combine 1½ cups of flour, sugar, yeast, zest and salt. In a saucepan (or microwave) heat the butter and milk to 120 to 130 degrees. Add the warmed liquid ingredients to the dry ingredients (stirring quickly with wooden spoon). Add the room temperature eggs and mix well; add one more cup of flour and beat until smooth. Stir in the rest of the flour, but do no knead the dough. Put the dough in a greased bowl and cover and let it raise in a warm place for about an hour. After an hour, push all of the air out of the dough and cover and refrigerate it overnight. (see note about rising times)

The next day, push any air out of the dough and turn it out onto a lightly floured counter; let it rest for 30 minutes (with inverted bowl over it).

If you want the traditional brioche shape, divide the dough so that you have 1/6th (for the little top knots) and divide the rest of the dough into 12 pieces. Roll the larger pieces into a ball and place in individual brioche pans (or cupcake pans) and make a dent in each one. Roll smaller balls (from the 1/6th portion) and set them on the indentation. Lightly spray the rolls with cooking spray (very lightly) and cover with plastic wrap. Let these raise in a warm place for one to two hours or until they are double in size. Gently brush the rolls with egg wash and bake at 375 for 15-18 minutes or until golden. Place a pan of water on the bottom rack of the oven while the brioche bake.

NOTE: I don't make the traditional brioche shape. I roll 12" "snakes" and then tie them in knots, tucking in the loose ends.
NOTE: I don't use an egg wash on mine because they get too crusty when I reheat them. I bake them without the egg wash and just brush them with a little butter when they come out of the oven the first time.
NOTE: Keep in mind that if you have granite counter tops, it is going to take longer for your dough to raise because they are so cool.

Rabu, 14 Oktober 2009

Posted by Unknown | File under : , ,
This is one of my favorite things to eat on the nights that hubby has opted to be carnivorous. It is a recipe big on flavor, veggies and cheese; my favorites are mushrooms, red peppers, onions, zucchini, beans, carrots, pasta, ricotta and Monterrey Jack cheese. It makes the BEST lunch on day two!!

Not the best photo, but trust me, it's excellent !!

½ cup onion chopped
½ cup celery chopped
1 cup chopped carrot
½ cup chopped red pepper
2 cups sliced mushrooms
2 cups diced zucchini
1 cup black beans
1 clove garlic minced
(1) 12 ounce can tomato paste
5 cups water
1 teaspoon salt
½ teaspoon pepper
1 teaspoon dry oregano
1 teaspoon dry sweet basil
1 teaspoon fennel seed (don't leave out)
scant ¼ teaspoon red pepper flakes
2 teaspoons brown sugar
2 cups small pasta cooked
ricotta cheese
2 cups Monterrey Jack cheese (grated)
2 tablespoon butter

 
In a large, deep pan, saute the onion, celery and garlic (in the butter) until the are sweet, then scoot them to one side of the pan. In the same pan, saute the rest of the raw veggies until they start to wilt. Add everything else (except the pasta and cheeses) and simmer slowly, for about an hour (without a lid so the sauce will thicken up). After an hour, stir in the cooked pasta and 1 cup of cheese.

To assemble this dish, pour half of the veggie mixture into a greased baking dish and top with small dollops of ricotta cheese (randomly over the mixture...but not a solid layer). Top with the other half of the veggie mixture and cover with shredded Monterrey Jack cheese. Bake at 350 for about 25 minutes.

NOTE: You can use any combination of veggies that your family likes in this dish.

NOTE: Any small pasta will work, just make sure that when it is cooked, it is bite size or the same size as the chopped veggies.

Kamis, 17 September 2009

Posted by Unknown | File under : , , ,
Lately I've been making calzones. They are a very versatile "hot sandwich" and since they require small amounts of filling...they are a good way to us any leftovers on hand. Hubby loves big meat sandwiches, so I've made them with leftover BBQ chicken, steak & cheese, ham & cheese, crisp bacon & cheese and yes, pizza goodies.

Personally, I like my calzones stuffed to the brim with veggies and a little pizza sauce & cheese. I have found, through trial and error, that you have to saute your veggies until tender then drain them well on a paper towel. If you don't, you will get a soggy-bottom crust on your sandwich. Any veggies will work. Roasted veggies are excellent, so are grilled veggies. Tonight I was lazy, so I just sauteed some broccoli, mushrooms, garlic, green onions and kidney beans, but usually, the more veggie variety the better.

I use my regular bread dough recipe (CLICK HERE) and jazz it up with 1/2 teaspoon black pepper, 1 teaspoon onion powder and 1/2 teaspoon garlic powder(add seasonings when you add the liquid in the recipe).

Normally, I would rather cut my arm off than show anyone my oven, but I wanted you to see MY secret for getting a pizzeria style pizza crust. It doesn't look like anything special, but it is truly the best way to cook pizza at home.

My hubby came up with this idea about 10 years ago when I was complaining that my pizza stone wasn't working the way I wanted it to (I wanted a crispy crust with nice pillowy edges). He cut a 1/4" thick piece of steel (to fit my oven) and I seasoned it like a cast iron frying pan. After you have seasoned it, you never grease it or wash it again, just wipe it off.....nothing sticks to it.
I preheat my oven (and the steel sheet) to 450 degrees and use cornmeal on my pizza peal so that the prepared pizza (or calzone) will slide off directly onto this sheet of hot steel (no pan). Bake for 8 minutes, then switch the heat to broil and (watching it carefully) let it broil for about 2 more minutes or until it is the color you want. It works great...no more doughy "steamed" crusts.

For calzones, you will need a ball of yeast dough about the size of a hardball. Roll it out to a nice thin circle. Place a mound of sauteed, and drained, veggies on one side of the circle and top them with 1/4 cup of pizza sauce (CLICK HERE FOR MY PIZZA SAUCE) and a serious hand full of grated mozzarella cheese. Fold the "empty" side of the calzone over the filling and pinch the edges together. Once pinched together, roll the pinched dough edge back onto itself to form a very tight seal. Using scissors, snip several vent holes in the top of the calzone. Bake at 450 for 8-10 minutes or until nice and golden. Just as soon as they come out of the oven, brush them with butter and sprinkle with parmesan and coarse salt.
VEGGIE CALZONE CUT IN HALF

Kamis, 03 September 2009

Posted by Unknown | File under : , , ,
I have always cooked with canned Ortega mild fire-roasted chilies (if hubby doesn't know they are in a recipe, he magically does not get heartburn lol). However, I have put off the urge to cook with fresh Anaheim chilies because I think he would seriously panic if he saw them. Well, recently, the opportunity to cook with fresh Anaheim's presented itself (hubby wouldn't he home for dinner) so I went for it. They were delicious!!
 
 GREEN ENCHILADA SAUCE


3 fresh Anaheim chilies
1 to 2 cloves of garlic
1/2 cup of chopped onion
2 tablespoons olive oil
1 teaspoon cumin

1/8 teaspoon cayenne
1-2 teaspoons chili powder
1 teaspoon salt
2 cups chicken broth
2 tablespoons flour

Wash and dry the chilies and put them under the broiler for 5-10 minutes (my broiler took about 8 minutes) turning the chilies about once a minute. You want the skins of the chilies to blacken on at least 60% of their surface. Remove them from the broiler and place them in a Tupperware container with a tight lid (this will help steam the chilies) for about 15 minutes. Next step is to peel off their skins, cut open and remove seeds and dice flesh; you should have about one cup of diced chilies (set aside).

In a frying pan, heat the olive oil and saute the onions and garlic until they are tender and mellow, then put them in a food processor along with 1 cup of prepared chilies, and 1/2 cup of the chicken broth and 2 tablespoons of flour; process until smooth. Transfer to a sauce pan and add the chili powder, cumin, salt and the remaining 1&1/2 cups of chicken broth. Cook until thick and bubbling; lower heat and simmer slowly for about 20 minutes. Use immediately.

While this enchilada sauce can be used on beef enchiladas, it does better with chicken or seafood. The enchiladas pictured here were made with surimi (fake crab). I just chopped the surimi into smaller pieces, mixed it with Monterey Jack cheese and a little of the green enchilada sauce and rolled the filling in tortillas, poured the sauce over them and topped with more cheese. Bake for about 30 minutes or until everything is hot and bubbly. They were light and tasty.

NOTE: I only used 1 teaspoon of mild chili powder. If you like more kick, add more.

Selasa, 11 Agustus 2009

Posted by Unknown | File under : , , , ,
This recipe is one the kids will get a kick out of...home made tater tots!! Super quick and simple to make, they are a mixture of chopped potatoes, shredded cheddar, egg, flour, seasonings and fried crisp in a little oil. They are excellent dipped in your favorite barbecue or ranch dressing...inexpensive too!!


2 medium Russet potatoes (see note)
1 cup shredded cheddar cheese (don't pack)
1/3 cup all purpose flour
1 teaspoon seasoning salt
1/4 teaspoon onion powder
1/4 teaspoon black pepper
1 beaten egg

Peel and cube potatoes into your food processor bowl. Pulse them a few times but don't chop them so fine that they become mush. (First picture is the cube size, second picture is the desired chopped size)

In a bowl, mix the chopped potatoes & 1 cup of loosely packed shredded cheddar cheese. Thoroughly mix in the flour (make sure everything is coated). Then add the rest of the ingredients and mix well. Let this mixture sit for about 5 minutes before you fry them. Heat 1/2" vegetable oil to 375.


Scoop spoonfuls of the potato mixture and compress it a little with your fingers while it is on the spoon. Push the "tater tot" off of the spoon (gently) into the shallow (hot) vegetable oil. Fry until golden brown (about 2 minutes per side). Season with salt while still hot.


NOTE: For those of you who live in Alaska, I don't think our Alaska potatoes would work very well in this recipe (the hold too much water and won't crisp up). Recipe calls for Russet (or baking potatoes).
NOTE: For a variation, I am going to try pepper Jack cheese in this recipe instead of the cheddar. I'll let you know how it goes.


Sabtu, 06 Juni 2009

Posted by Unknown | File under : , ,
I am addicted to a great super-simple salad. It is basically baby spinach, orange segments, avocado and sliced almonds. The orange segments make the salad so juicy, that I don't even need a dressing, although there is an orange vinaigrette for those who would like one. It is refreshing and quick to fix (not to mention it also goes with anything from the grill).

4 cups fresh baby spinach
2 oranges, peeled and sectioned
1 large Haas avocado peeled, and sliced
2 tablespoons sliced almonds toasted

This recipe makes 4 salads. Rinse and dry baby spinach and divide onto four plates. Slice the ends of the orange off and use a knife to peel the orange. Slice in between the segments so you get only the best part of the orange. Arrange the orange and avocado on the spinach and top with toasted nuts.

Orange Vinaigrette:
In a jar, put 1/3 cup fresh squeezed orange juice, 1 teaspoon finely shredded orange zest, 2 teaspoons red wine vinegar, 2 teaspoons salad oil, 1/8 teaspoon salt, dash black pepper. Put the lid on the jar and shake well.

Sabtu, 16 Mei 2009

Posted by Unknown | File under : , , ,
When my carnivorous husband grills, I usually make this for myself instead . It is filling, healthy, spicy and delicious. Topped with cold avocado, sweet cherry tomatoes, a little cheddar, light sour cream and a piece of whole wheat garlic bread, it is my guiltless pleasure!

CLICK ON PHOTO TO ENLARGE
1 cup of chopped onion
1 clove of garlic minced
½ cup celery chopped

1/2 cup carrot chopped
1 cup chopped red bell pepper
1 cup raw rice
3 teaspoons chili powder
½ teaspoon ground cumin
1 teaspoon salt
½ teaspoon black pepper
1 (15 oz) black beans
1 cup fresh corn
1 (15 oz) can diced tomatoes
1½ tomato cans of water
(1) 4 ounce Ortega mild green chilies


Sauté onion, garlic, celery, bell pepper in 1-tablespoon canola oil until onion is transparent. Stir in raw rice and let it sauté with veggies until it become opaque. Add the diced tomatoes, water, black beans, corn, carrot and flavorings. Cover the pan and lower the heat to a simmer and cook for 20 minutes (do not raise the lid). After 20 minutes, rice should be cooked and veggies tender. Stir in mild green chilies. Mix well and serve with cold avocado, cherry tomatoes, cheddar cheese and light sour cream.

NOTE: This reheats very well and is even tastier on day two.
NOTE: I also like to eat this rolled up in a warmed tortilla.

Selasa, 05 Mei 2009

Posted by Unknown | File under : , , ,
This is a quick side dish for today’s Cinco de Mayo dinner. It has traditional coleslaw veggies with just a slight twist on the dressing.

1/3 cup mayonnaise
1 tablespoon limejuice
2 teaspoons honey
¼ teaspoon ground cumin
1/8 to ¼ teaspoon ground chipotle chile pepper
3 cups shredded green cabbage
½ cup chopped red cabbage
1/3 cup chopped red onion
¾ cup chopped red (or yellow) bell pepper
2 tablespoons chopped cilantro (optional)


Stir together mayonnaise, juice, honey, cumin and ground chipotle pepper (set aside). Combine remaining ingredients, pour chipotle dressing over, and toss to mix. Serve immediately (or chill up to 24 hours).